1. Example 3 - Passing Data between Components by File
이전 글에 이어서 예제를 계속 이어나갑니다. 이번에는 첫 번째 컴포넌트에서 file에 data를 쓴 뒤, 두 번째 컴포넌트에서는 해당 file로부터 데이터를 읽어 두 수의 곱을 구하는 pipeline 예제입니다. Component 간에 데이터를 주고받는 방법에는 위의 add_example의 예시처럼 변수를 통해서 넘겨줄 수도 있지만, 데이터의 사이즈가 큰 경우에는 파일에 저장한 뒤, 파일 경로를 전달하는 방식으로 데이터를 넘겨줄 수 있습니다

data_passing_file.py 로 하나 만들겠습니다. 이전 글에서 주의한 것처럼, 주석은 참고만 하고 한글 내용은 전부 제거하고 반영하여야 합니다.
      <python />


      import kfp
from kfp.components import InputPath, OutputPath, create_component_from_func


# decorator 사용
@create_component_from_func
def write_file_op(
    # _path 라는 suffix 를 붙이고, type annotaion 은 OutputPath 로 선언
    data_output_path: OutputPath("dict")
):
    # package import 문은 함수 내부에 선언
    import json

    # dict data 선언
    data = {
        "a": 300,
        "b": 10,
    }

    # file write to data_output_path
    with open(data_output_path, "w") as f:
        json.dump(data, f)


@create_component_from_func
def read_file_and_multiply_op(
    # input 역시, _path 라는 suffix 를 붙이고, type annotation 은 InputPath 로 선언
    data_input_path: InputPath("dict")
) -> float:
    # package import 문은 함수 내부에 선언
    import json

    # file read to data_output_path
    with open(data_input_path, "r") as f:
        data = json.load(f)

    # multiply
    result = data["a"] * data["b"]

    print(f"Result: {result}")

    return result


@kfp.dsl.pipeline(name="Data Passing by File Example")
def data_passing_file_pipeline():
    write_file_task = write_file_op()
    _ = read_file_and_multiply_op(write_file_task.outputs["data_output"])


if __name__ == "__main__":
    kfp.compiler.Compiler().compile(
        data_passing_file_pipeline,
        "./data_passing_file_pipeline.yaml"
    )
얼핏 보면 비슷해 보이지만 "정해진 Rule"이라는 것이 있습니다. 반드시 Rule 대로 작성을 해야 하는데, 위와 같이 component, pipeline을 작성하면 kubeflow pipeline SDK 가 관련 부분을 file passing으로 인식하여 pipeline 컴파일 시에 관련 처리를 자동화해줍니다.
- Rule :
- component의 argument를 선언할 때, argument name의 suffix로 _path를 붙이고, type annotation을 kfp.components.InputPath 혹은 kfp.components.OutputPath로 선언합니다.
- 컴파일된 Workflow yaml 파일을 확인하여, add_pipeline.yaml 와 어떤 점이 다른지 확인해봅니다. 컴파일을 수행하면 yaml 파일이 생긴 것을 알 수 있습니다.

- 아래 yaml 파일의 dag 부분을 보면, arguments의 value로 parameter 가 아닌, artifacts(파란색 동그라미)로 선언되어 있는 것을 확인할 수 있습니다.
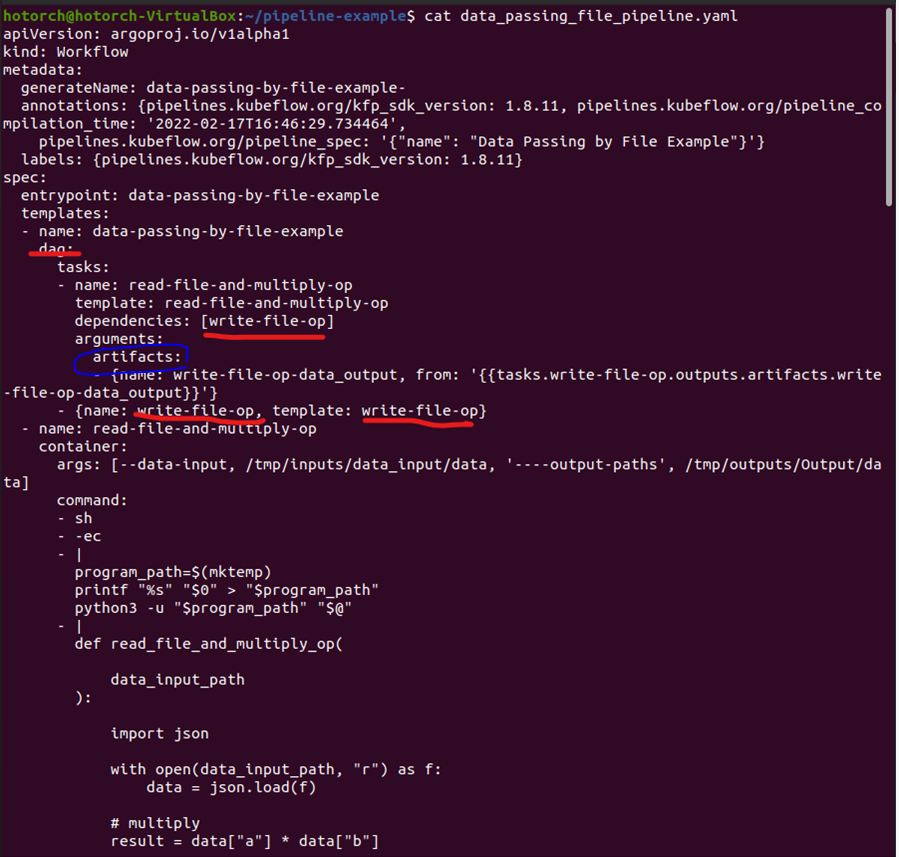
- 아래 yaml 파일의 dag 부분을 보면, arguments의 value로 parameter 가 아닌, artifacts(파란색 동그라미)로 선언되어 있는 것을 확인할 수 있습니다.
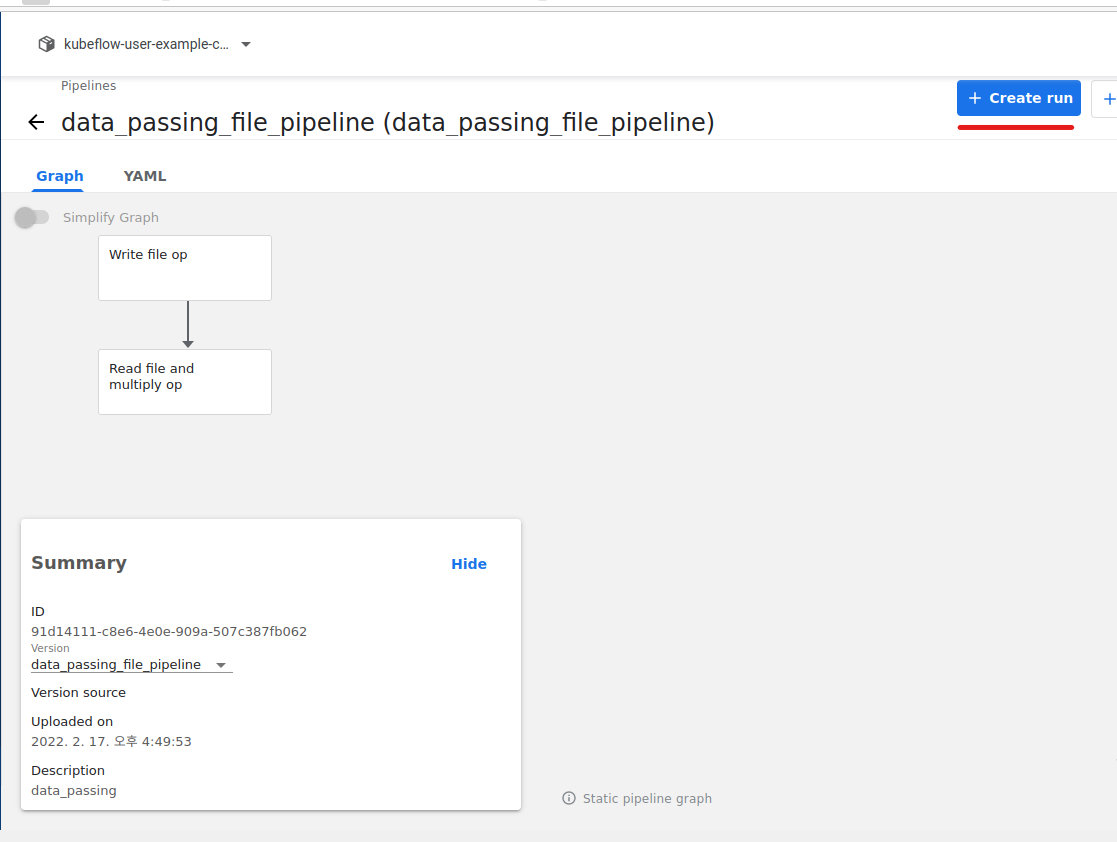
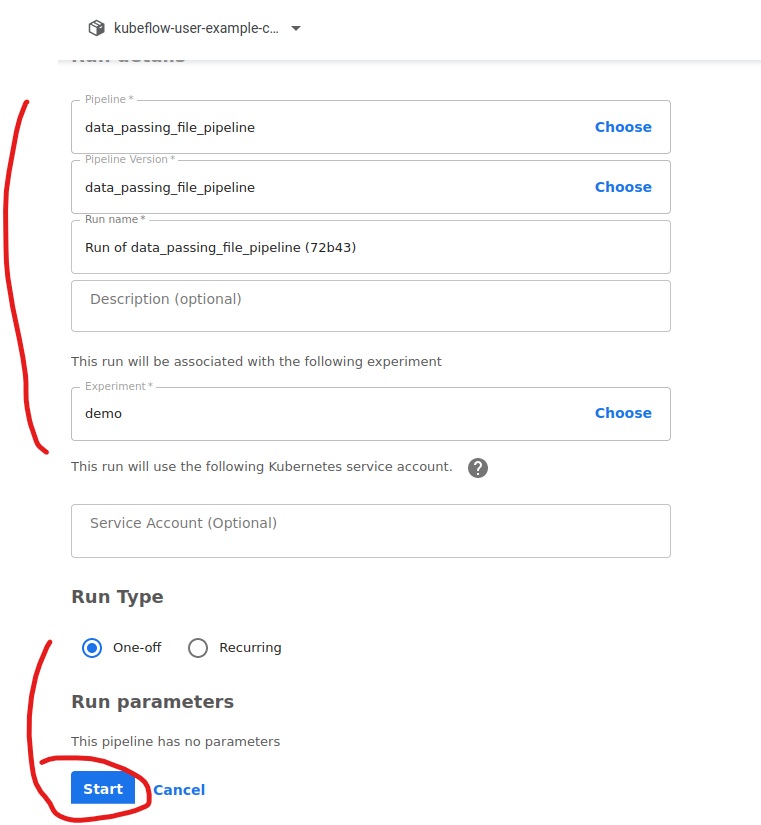
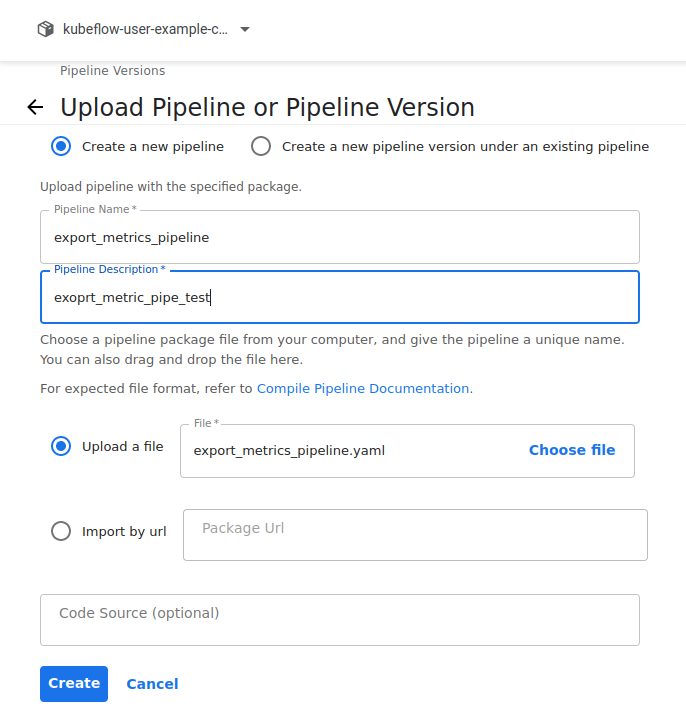
UI를 통해 pipeline 업로드 후, 실행해봅니다. 컴포넌트 간의 input, output 이 어떻게 연결되는지 확인합니다. 저번처럼 yaml 파일을 pipeline에 업로드합니다.
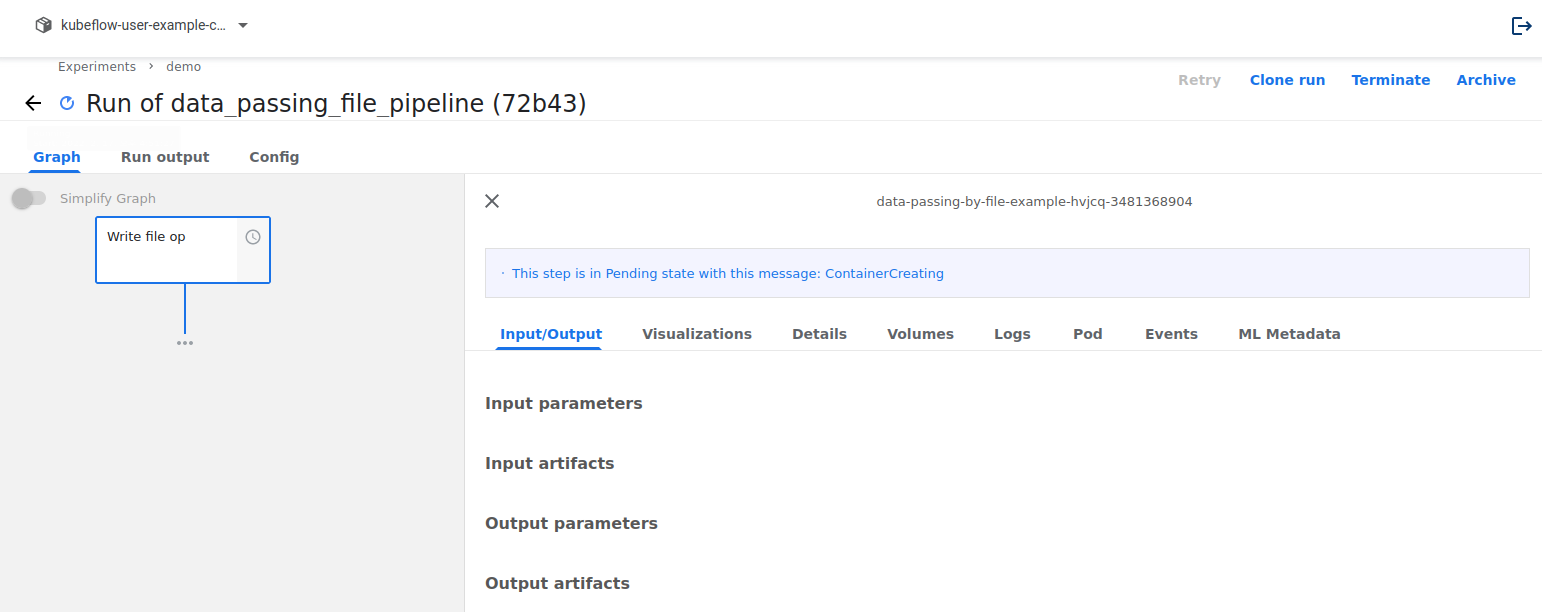
아래와 같이 dag가 생성된 것을 알 수 있습니다.
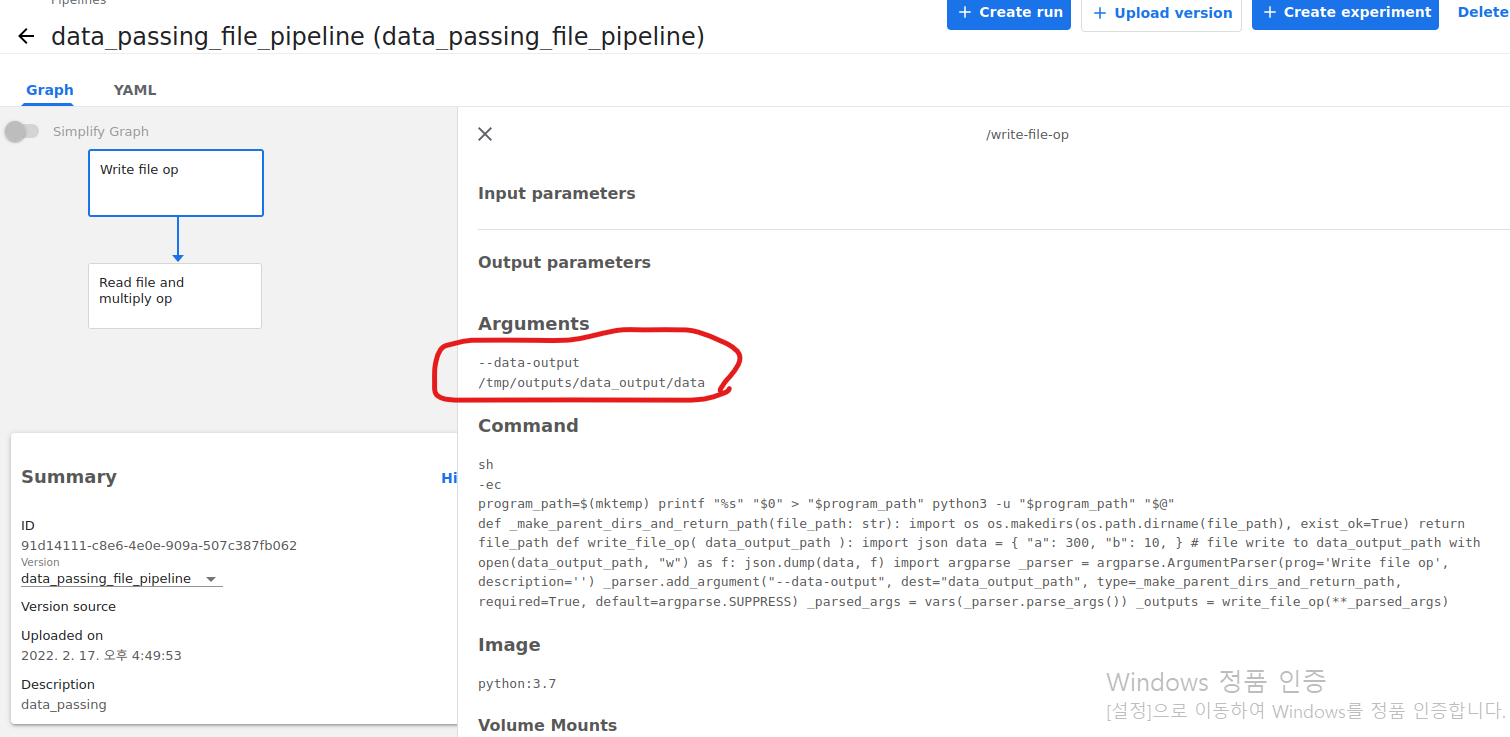
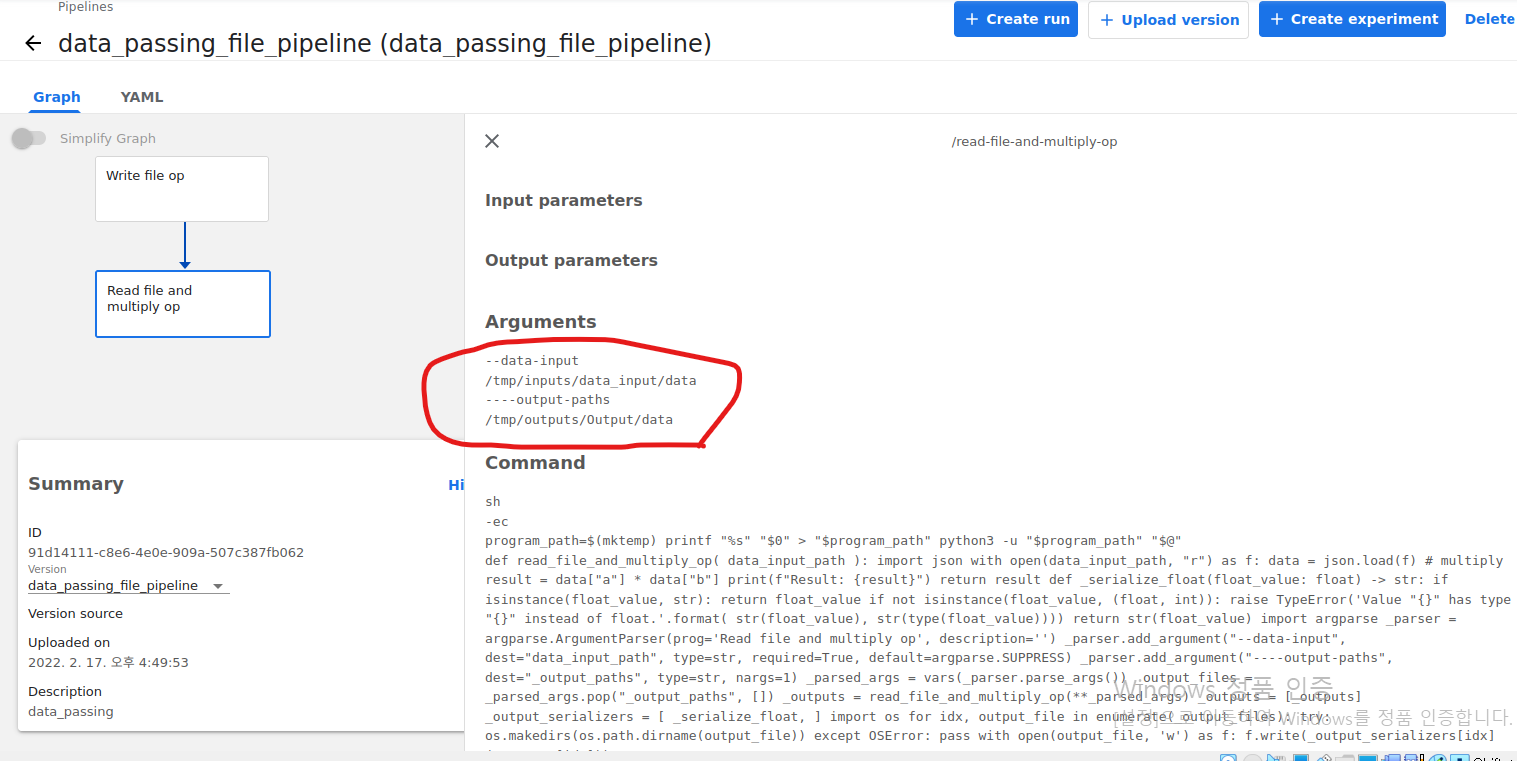
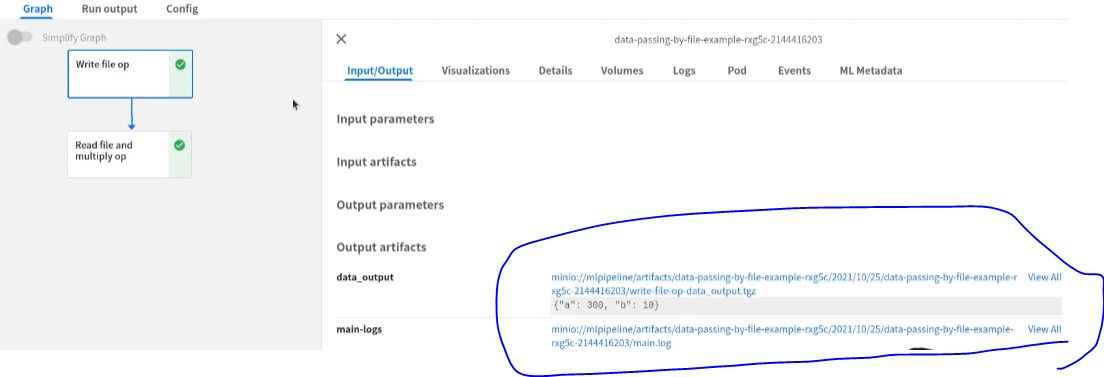
각 Components에 대한 I/O를 확인해보겠습니다. 동그라미를 보시면 됩니다.
Run을 해보겠습니다.
펜딩 중입니다. 기다려 줍니다.
다 되면 아래처럼 된 것을 확인할 수 있고, 아래 data_output 부분에서 tgz를 누르면 전달해주는 데이터를 확인할 수 있습니다.
2. Example 4 - Export Metrics in Components
Components에서 Metrics를 남기는 pipeline 예제입니다. 하나의 components에서 metric을 export 하는 output은 아래와 같습니다.
export_metrics.py를 하나 만들겠습니다. 코드는 아래와 같습니다.
      <python />


      import kfp
from kfp.components import OutputPath, create_component_from_func


@create_component_from_func
def export_metric_op(
    mlpipeline_metrics_path: OutputPath("Metrics"),
):
    # package import 문은 함수 내부에 선언
    import json

    # 아래와 같이 정해진 형태로, key = "metrics", value = List of dict
    # 단, 각각의 dict 는 "name", "numberValue" 라는 key 를 가지고 있어야 함
    # "name" 의 value 로 적은 string 이 ui 에서 metric 의 name 으로 parsing 됨
    # 예시이므로, 특정 모델에 대한 값을 직접 계산하지 않고 const 로 작성
    metrics = {
        "metrics": [
            # 개수는 따로 제한이 없음. 하나의 metric 만 출력하고 싶다면, 하나의 dict 만 원소로 갖는 list 로 작성
            {
                "name": "auroc",
                "numberValue": 0.8,  # 당연하게도 scala value 를 할당받은 python 변수를 작성
            },
            {
                "name": "f1",
                "numberValue": 0.9,
                "format": "PERCENTAGE",
                # metrics 출력 시 포맷을 지정 가능하며, Default 는 "RAW" 이며 PERCENTAGE 를 사용할 수도 있음
            },
        ],
    }

    # 위의 dict 타입의 변수 metrics 를 mlpipeline_metrics_path 에 json.dump
    with open(mlpipeline_metrics_path, "w") as f:
        json.dump(metrics, f)


@kfp.dsl.pipeline(name="Export Metrics Example")
def export_metrics_pipeline():
    write_file_task = export_metric_op()


if __name__ == "__main__":
    kfp.compiler.Compiler().compile(
        export_metrics_pipeline,
        "./export_metrics_pipeline.yaml"
    )
앞의 예제처럼 이번 예제도 반드시 Rule 대로 진행을 하여야 합니다.
- Rule :
- component의 argument를 선언할 때, argument name 은 mlpipeline_metrics_path 여야 하며, type annotation 은 OutputPath('Metrics')로 선언합니다.
- component 내부에서 metrics를 위의 코드의 주석의 룰을 지켜 선언하고 json dump 하여 사용합니다.
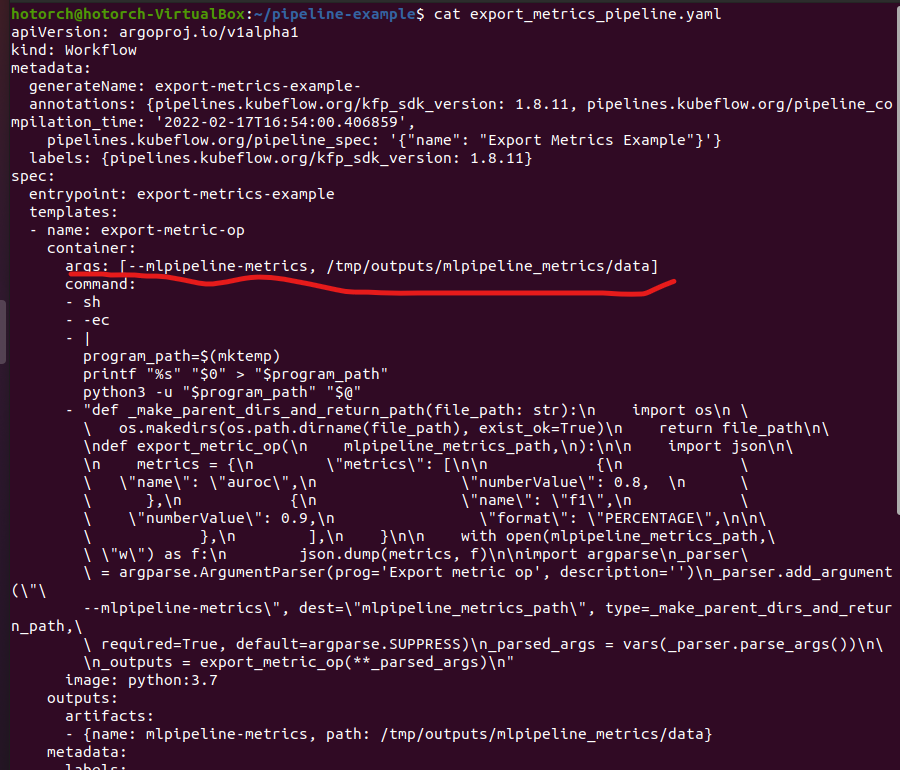
- 컴파일된 Workflow yaml 파일을 확인하여, add_pipeline.yaml 와 어떤 점이 다른지 확인해봅니다. args도 따로 확인해줍니다.
- yaml 파일의 dag 부분을 보면, arguments의 value로 parameter 가 아닌, artifacts로 선언되어 있는 것을 확인할 수 있습니다.
- 주의사항
- metrics의 name 은 반드시 다음과 같은 regex pattern 을 만족해야 합니다.
- ^[a-zA-Z]([-_a-zA-Z0-9]{0,62}[a-zA-Z0-9])?$
- metrics 의 numberValue의 value는 반드시 numeric type 이어야 합니다.
- metrics의 name 은 반드시 다음과 같은 regex pattern 을 만족해야 합니다.
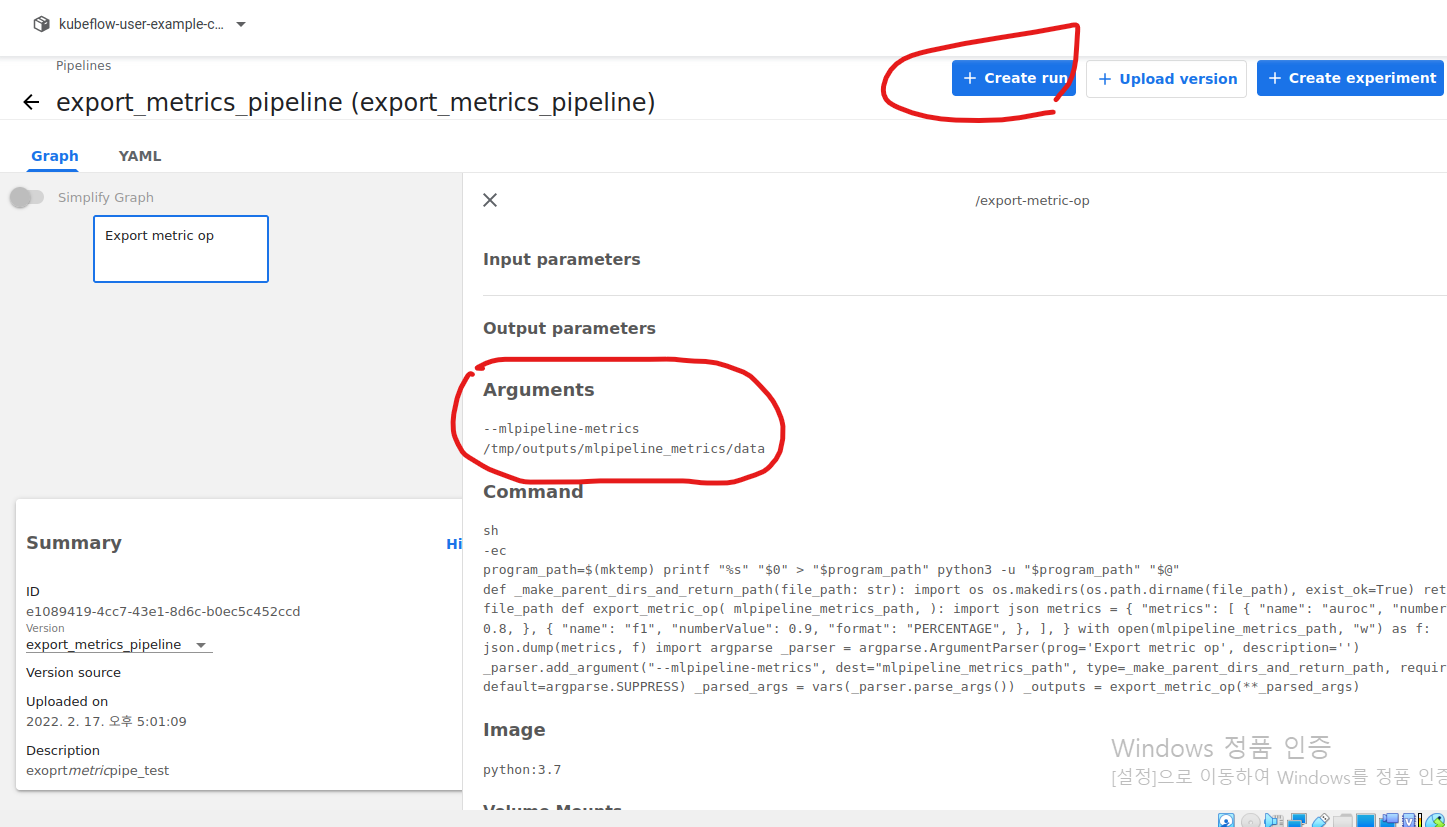
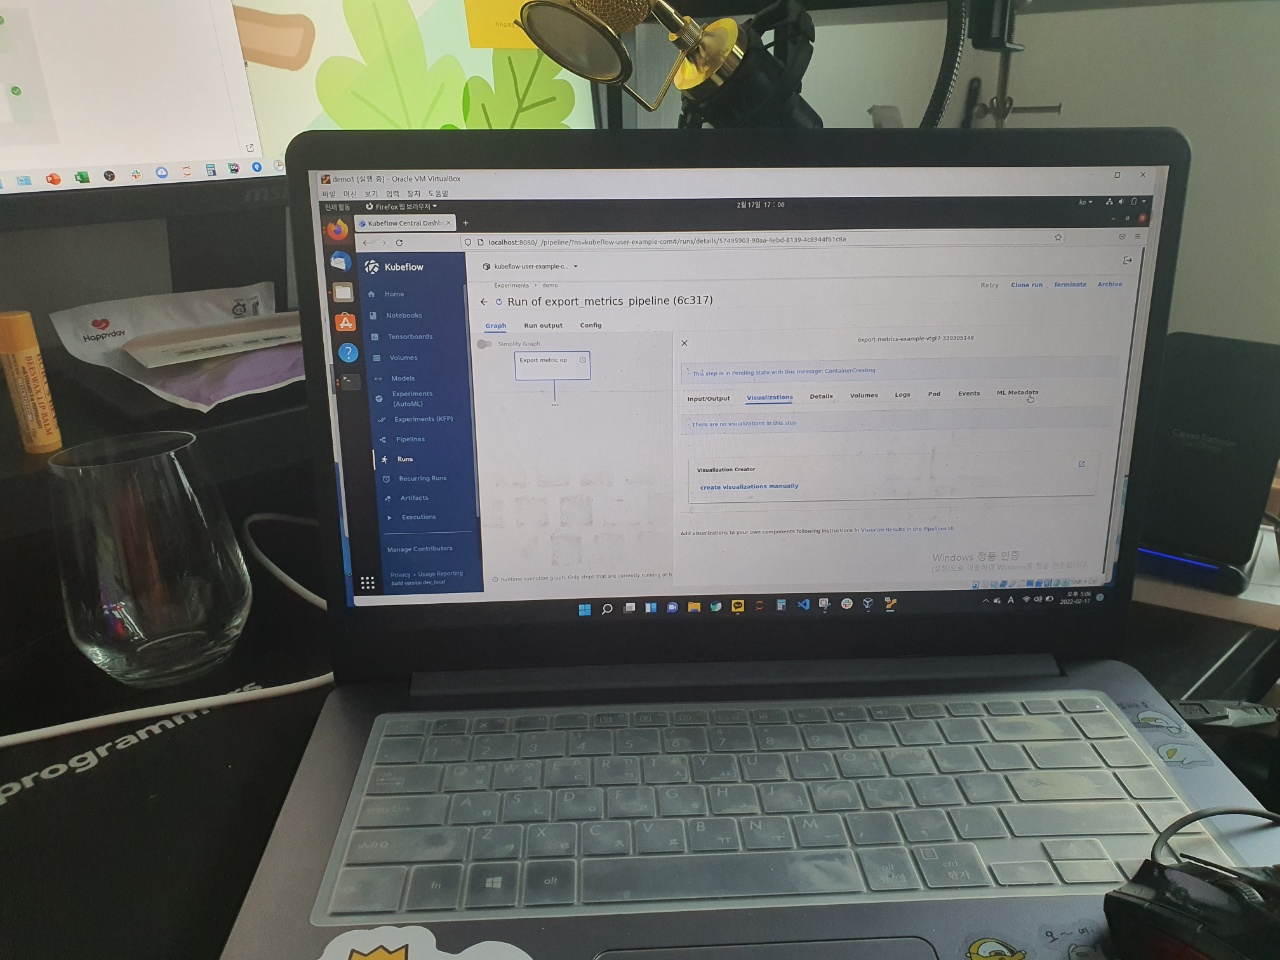
순서는 아래와 같이 진행하며 이전 예제들과 크게 다를 것이 없습니다. UI를 통해 pipeline 업로드 후, 실행해봅니다. Run output을 눌러 Metrics이 어떻게 출력되는지 확인합니다.
Argument들이 위의 yaml 사진의 빨간 밑줄 친 것과 같음을 알 수 있습니다.
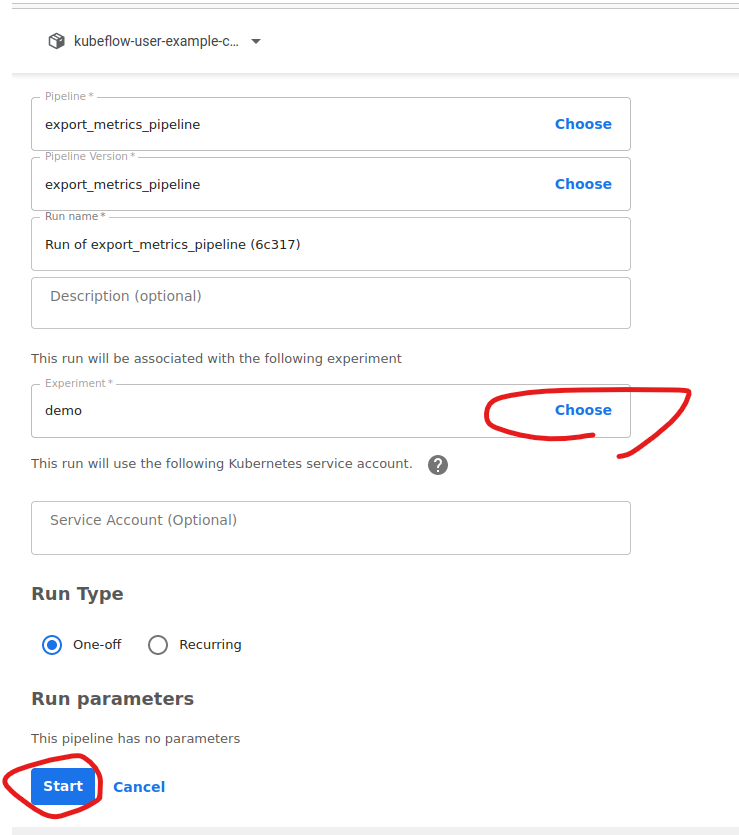
Run을 수행합니다.
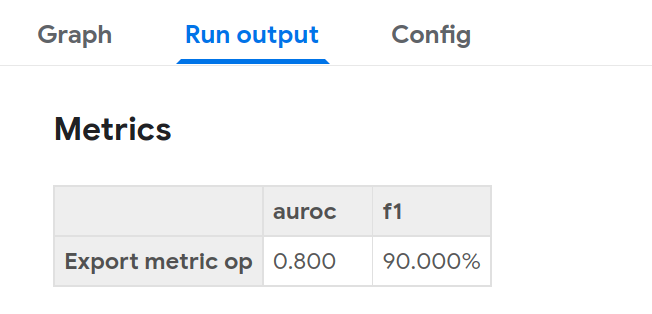
펜딩이 끝나면 다음처럼 나타나고 metrics 값들을 확인이 가능합니다.
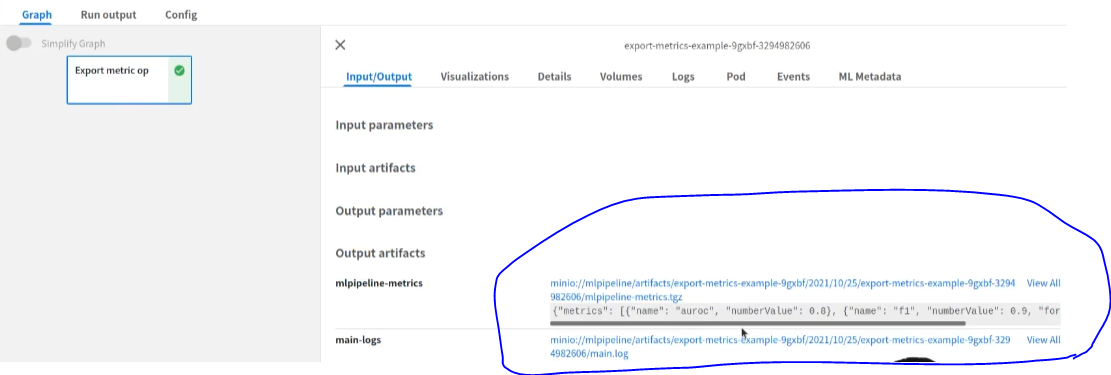
metrics를 출력한 component의 이름, 그리고 해당 component에서의 key, value를 확인할 수 있습니다.
이 예제들 이외에 CPU Memory, GPU, PVC 할당하는 기능을 Pipeline에 구현을 할 수 있으며, 특정 조건하에만 Components가 작동하는 Conditional Pipeline, 다수의 동일한 Components를 병렬로 실행하는 Parallel Pipeline 들도 많이 활용이 됩니다. 다음 글에서는 Katib 관련 글로 찾아뵙겠습니다.
패스트캠퍼스 [직장인 실무교육]
프로그래밍, 영상편집, UX/UI, 마케팅, 데이터 분석, 엑셀강의, The RED, 국비지원, 기업교육, 서비스 제공.
fastcampus.co.kr
* 본 포스팅은 패스트캠퍼스 환급 챌린지 참여를 위해 작성되었습니다.
 |
 |
'AI > MLOps' 카테고리의 다른 글
| [패스트캠퍼스 챌린지 29일차] Kubeflow Katib Practice (0) | 2022.02.21 |
|---|---|
| [패스트캠퍼스 챌린지 28일차] Kubeflow Katib (0) | 2022.02.20 |
| [패스트캠퍼스 챌린지 26일차] Kubeflow Pipeline (1) (0) | 2022.02.18 |
| [패스트캠퍼스 챌린지 25일차] Kubeflow 기능 살펴보기 (0) | 2022.02.17 |
| [패스트캠퍼스 챌린지 24일차] Kubeflow (0) | 2022.02.16 |