이번 글에서는 Github Actions를 활용하여 Docker Image를 Build 하는 내용을 다루겠습니다. 본인 계정의 Github을 이용하면 되겠습니다.
우선 아래처럼 github new repository를 만듭니다.

actions Tab을 가보면 수많은 Workflow들이 있습니다. 매우 다양한 툴들을 통합하기 쉽게 되어 있습니다.

Python Application을 활용하겠습니다. 검색을 하시면 됩니다.

Configure를 누르면, workflows 하위 폴더에 yml 파일이 생성됩니다.
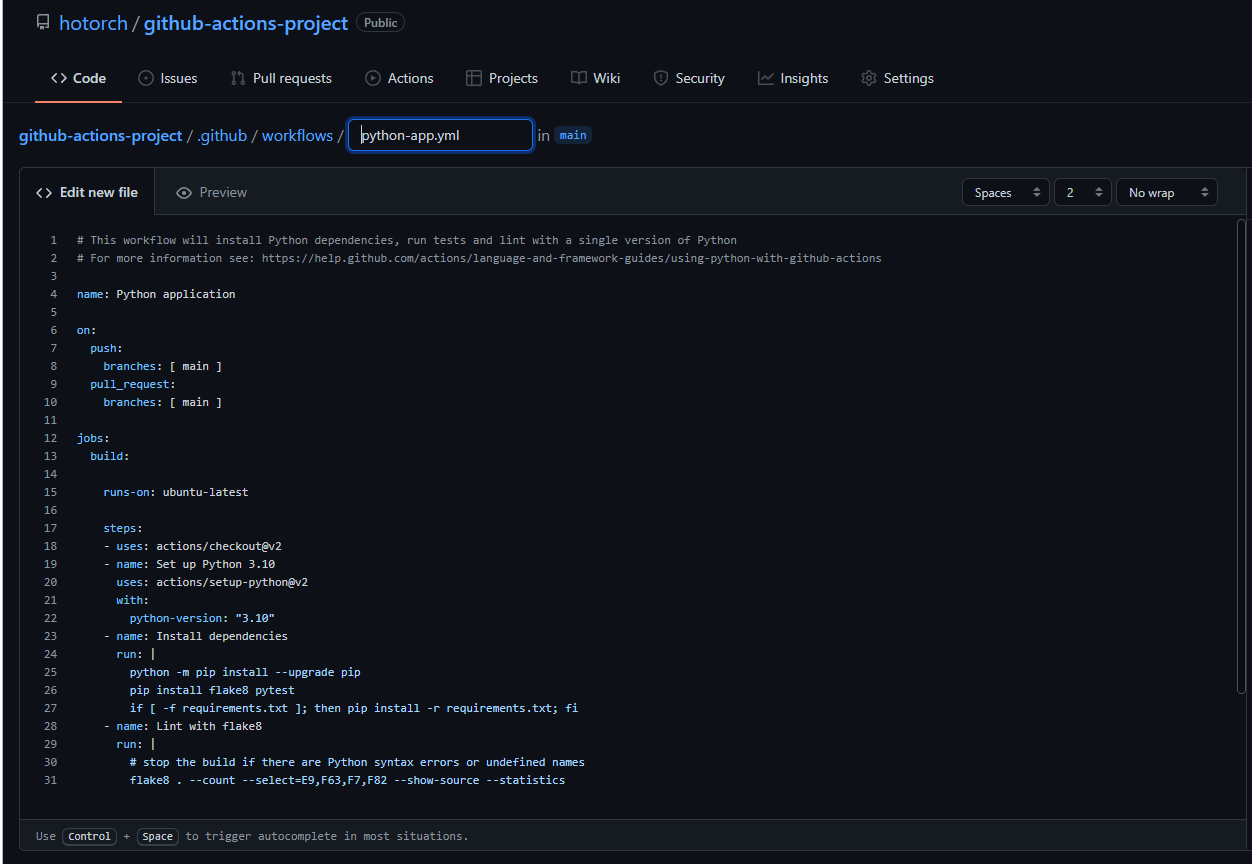
코드 내용을 아래에 첨부하겠습니다. 코드를 붙이지 말고 한번 보기만 하겠습니다.
# This workflow will install Python dependencies, run tests and lint with a single version of Python
# For more information see: https://help.github.com/actions/language-and-framework-guides/using-python-with-github-actions

name: Python application

on: # 아래 main branch에 의한 어떠한 조건을 나타내는 것임
  push:
    branches: [ main ]
  pull_request:
    branches: [ main ]

# workflow 를 시작하게 할 수 있는 Github event 의 이름, 여러개의 Job을 선언이 가능함
jobs:
  build:

    runs-on: ubuntu-latest

    # 다음 step으로 위 job 중에서 build를 진행해 달라는 뜻이며 - 단위로 수행함.
    steps:
    - uses: actions/checkout@v2
    - name: Set up Python 3.10
      uses: actions/setup-python@v2
      with:
        python-version: "3.10"
    - name: Install dependencies
      run: |
        python -m pip install --upgrade pip
        pip install flake8 pytest
        if [ -f requirements.txt ]; then pip install -r requirements.txt; fi
    - name: Lint with flake8
      run: |
        # stop the build if there are Python syntax errors or undefined names
        flake8 . --count --select=E9,F63,F7,F82 --show-source --statistics
        # exit-zero treats all errors as warnings. The GitHub editor is 127 chars wide
        flake8 . --count --exit-zero --max-complexity=10 --max-line-length=127 --statistics
    - name: Test with pytest
      run: |
        pytest
user 부분을 설명하기 전에, actions를 먼저 알아보겠습니다.
GitHub Actions
Automate your GitHub workflows. GitHub Actions has 46 repositories available. Follow their code on GitHub.
github.com
actions들에 대한 templete들이 많이 제공이 되는데, repository에서 set up python을 살펴보겠습니다.

사용하는 방법에 대해 usage에 기술되어있습니다.

즉, python을 설치하기 위해서 많은 일들을 거쳐야하는데 위의 templete를 이용하면 알아서 setup을 할 수 있습니다.
setup python 말고, checkout 도 한번 살펴보겠습니다. repo에 checkout을 들고 와 사용이 가능합니다. 즉 반복적인 일들을 편하게 사용할 수 있다는 뜻입니다.

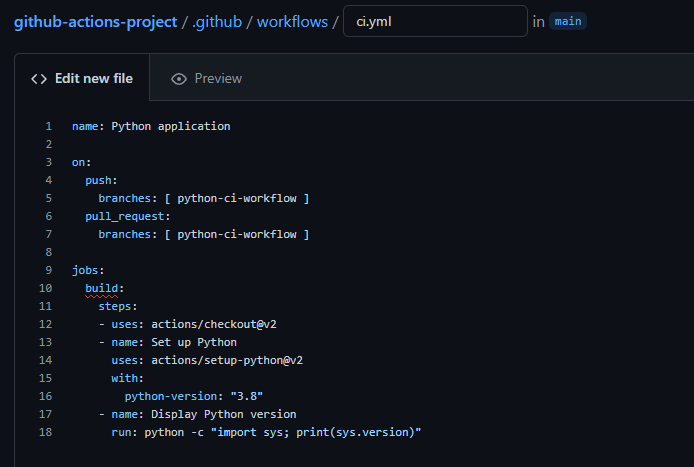
이제 build를 해보겠습니다. 아래 코드 예시만 활용할 예정입니다. run에 대한 설명은 CLI Command에 입력하는 것과 똑같습니다. yml file이름을 ci.yml로 하겠습니다.
(전체적인 과정은 Start commit → Create a new branch.. → 이름을 'python-ci-workflow' 로 변경 → Create pull request 입니다. )
name: Python application

on:
  push:
    branches: [ python-ci-workflow ]
  pull_request:
    branches: [ python-ci-workflow ]

jobs:
  build:
    steps:
    - uses: actions/checkout@v2
    - name: Set up Python
      uses: actions/setup-python@v2
      with:
        python-version: "3.8"
    - name: Display Python version
      run: python -c "import sys; print(sys.version)"
start commit을 누르고, new branch를 새로 만들어서 아래 그림과 같이 수행합니다.

그 후, create pull request를 누르겠습니다.

에러가 나타난 것을 알 수 있는데, runs-on을 추가하라고 합니다.

code로 돌아가 새로 만든 branch로 들어간 후 ci.yml 파일로 들어가 수정을 합니다. runs-on은 실행되는 서버의 운영체제를 나타냅니다. ubuntu 최신 버전을 반영하겠습니다. macos, window 전부 가능합니다.

actions tab으로 들어가서 작업한 내용들을 전부 확인할 수 있습니다. 즉, 단계별로 확인이 가능합니다.


그렇다면 서버가 있어야 수행이 되는 건데, 어디에 관리되고 있는 것인가?라고 궁금증이 생길 수 있습니다. 이 부분은 Github에 의해 관리되며, Workflow의 각 Jobs는 새로운 환경에서 실행이 된다고 생각하면 됩니다.
만약에 세 가지 운영 체제 모두에 대해 세 개의 build를 병렬로 실행하고 싶다면 아래 yml 파일로 수정하여 반영하여도 됩니다. window같은 경우는 python 3.6을 지원합니다.
name: Python application

on:
  push:
    branches: [ python-ci-workflow ]
  pull_request:
    branches: [ python-ci-workflow ]

jobs:
  build:
    runs-on: ${{ matrix.os }}
    strategy:
      matrix:
        os: [ubuntu-latest, macos-latest, windows-latest]
        python-version: ['3.6', '3.8']
        exclude:
          - os: macos-latest
            python-version: '3.8'
          - os: windows-latest
            python-version: '3.6'

    steps:
    - uses: actions/checkout@v2
    - name: Set up Python
      uses: actions/setup-python@v2
      with:
        python-version: ${{ matrix.python-version }}
    - name: Display Python version
      run: python -c "import sys; print(sys.version)"
Build에 대한 내용은 여기까지 하겠습니다. 다음 글에서는 docker에서 Build를 하고, Push하는 내용까지 다음 글에 작성하겠습니다.
패스트캠퍼스 [직장인 실무교육]
프로그래밍, 영상편집, UX/UI, 마케팅, 데이터 분석, 엑셀강의, The RED, 국비지원, 기업교육, 서비스 제공.
fastcampus.co.kr
* 본 포스팅은 패스트캠퍼스 환급 챌린지 참여를 위해 작성되었습니다.
 |
 |
'AI > MLOps' 카테고리의 다른 글
| [패스트캠퍼스 챌린지 40일차] Model Tracking - CML (0) | 2022.03.04 |
|---|---|
| [패스트캠퍼스 챌린지 39일차] Github Actions CICD - Push (0) | 2022.03.03 |
| [패스트캠퍼스 챌린지 37일차] ML Workflow (0) | 2022.03.01 |
| [패스트캠퍼스 챌린지 36일차] Feast - ML lifecycle (0) | 2022.02.28 |
| [패스트캠퍼스 챌린지 35일차] Feast Server 생성 (0) | 2022.02.27 |